Connecting to WebIOPi from Android
The last time when I published DRGPIO I received a couple of requests to explain the "inner workings" of DRGPIO.
This time, I'm going to try to explain how to use a small API to connect to WebIOPi, It's very simple and is available on Github if you find it interesting or useful for your projects.
How DRGPIO works?
First, DRGPIO works pooling continuously WebIOPi and parsing it's JSON responses to create instances of GPIOStatus. This class reflects the current state of all the pins on the Raspberry Pi GPIO port.
The Android API doesn't allow you to make network requests on the main thread of execution. The reason for having this limitation is that this could block the user interface while the request is completed.
One solution to bypass this restriction, is to use the AsyncTask class included on the Android API. But, I wanted something that worked not only on Android but on any Java program.
The solution then, was to create a "small class" that serves as a shell for launching a series of background process. This class pools continuously WebIOPi to update the interface and send REST requests to WebIOPi each time that we want to access to a specific function of WebIOPi.
This way, we can make complete "asynchronous" calls to WebIOPi without worrying about blocking the user interface.
How to use It?
You can download libGPIO from Github in the following address:
Copy the downloaded source code to your Android application project.
Creating a basic Activity
For this example I have created a basic activity that you can download from the following address to use it as a template to start:
If you open now the MainActivity.java it's going to look like this:
package com.example.gpiotest;

import android.os.Bundle;
import android.app.Activity;
import android.view.Menu;

public class MainActivity extends Activity {

 @Override
 protected void onCreate(Bundle savedInstanceState) {
  super.onCreate(savedInstanceState);
  setContentView(R.layout.activity_main);
 }

 @Override
 public boolean onCreateOptionsMenu(Menu menu) {
  // Inflate the menu; this adds items to the action bar if it is present.
  getMenuInflater().inflate(R.menu.activity_main, menu);
  return true;
 }

}
Its important to add the "Internet" permission to your application. On the template I have already added it, but if you are working on your own application just remember to add the following line to AndroidManifest.xml:
<uses-permission
android:name="android.permission.INTERNET"/>
On the zipfile provided I have already included the source code for libGPIO. The next step is to import the package and next we are going to initialize our GPIO instance inside the "onCreate" method.
Setting up a new connection
Its important to specify a GPIO.ConnectionInfo instance. This is just a class that contains the host, port, username and password of our WebIOPi installation.
package com.example.gpiotest;

import android.os.Bundle;
import android.app.Activity;
import android.view.Menu;
import co.teubi.raspberrypi.io.*;

public class MainActivity extends Activity {

 private GPIO gpioPort;

 @Override
 protected void onCreate(Bundle savedInstanceState) {
  super.onCreate(savedInstanceState);
  setContentView(R.layout.activity_main);

  gpioPort = new GPIO(
    new GPIO.ConnectionInfo(
      "192.168.0.4",
      8000,
      "webiopi",
      "raspberry"
      )
    );
 }

 @Override
 public boolean onCreateOptionsMenu(Menu menu) {
  // Inflate the menu; this adds items to the action bar if it is present.
  getMenuInflater().inflate(R.menu.activity_main, menu);
  return true;
 }

}
At this time it's a good idea to add a couple of click handlers to our buttons. On this example we are going to work with just one GPIO port on the Raspberry Pi to simplify the code.
Handling user interactions
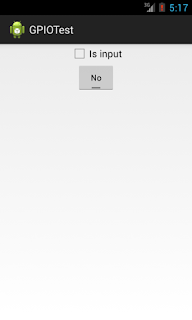
So we only have one checkbox to configure it as an Input or Output and a toggle button to change the value on the port.
  CheckBox cb = (CheckBox)findViewById(R.id.chkIsInput);

  cb.setOnClickListener(new View.OnClickListener() {

   @Override
   public void onClick(View v) {
    // TODO Auto-generated method stub

   }
  });

  ToggleButton tb = (ToggleButton)findViewById(R.id.btnPort);

  tb.setOnClickListener(new View.OnClickListener() {

   @Override
   public void onClick(View v) {
    // TODO Auto-generated method stub

   }
  });
Updating the User Interface
The GPIO class is designed to really be easy to use. The first thing that we would to know is the "current" status of the port. To do this we need to implement the interface GPIO.PortUpdateListener. We need to modify our class definition to make it look like this:
public class MainActivity extends Activity implements GPIO.PortUpdateListener
And then we need to implement the method "onPortUpdate" this way:
 @Override
  public void onPortUpdated(final GPIOStatus stat) {
    // TODO Auto-generated method stub

  }
This method is going to be called each time that the port is updated. The current state of the port is reflected on "stat".
I'm going to add a couple of lines of code that are going to update the UI with the port information.
Note that I'm using the method "runOnUIThread".
Remember that the WebIOPi pooling is made on a background thread, onPortUpdated is going to be called from that thread so if we try to update directly the UI is going to give us an error.
You can note in the code that we are using the port 18.
  @Override
  public void onPortUpdated(final GPIOStatus stat) {
   runOnUiThread(new Runnable() {
   public void run() {
    // First check if the port is configured
    // as an input or output
    if(stat.ports.get(18).function==PORTFUNCTION.INPUT) {

     // Check the checkbox
     ((CheckBox) findViewById(R.id.chkIsInput)).setChecked(true);


     // If is an Input disable the button
     ((ToggleButton) findViewById(R.id.btnPort)).setEnabled(false);

     // Set the checked state based on the current port value
     ((ToggleButton) findViewById(R.id.btnPort)).setChecked(stat.ports.get(18).value.toBool());
    } else if (stat.ports.get(18).function==PORTFUNCTION.OUTPUT) {

     // Un-check the checkbox
     ((CheckBox) findViewById(R.id.chkIsInput)).setChecked(false);


     // If is an Output enable the button
     ((ToggleButton) findViewById(R.id.btnPort)).setEnabled(true);

     // Set the checked state based on the current port value
     ((ToggleButton) findViewById(R.id.btnPort)).setChecked(stat.ports.get(18).value.toBool());

    } else {
    }
   }
   });
  }
To start monitoring the status of the port, you will need to add the current class to the PortUpdateListeners array on GPIO and start a new Thread to do this just add the following code at the end of "onCreate" method.
Remember that at this point we assume that WebIOPi is running on our Raspberry PI:
    this.gpioPort.addPortUpdateListener(this);
    (new Thread(this.gpioPort)).start();
Controlling the port
At this point, we are interested on control the port. To do this simply use the methods "setFunction" and "setValue" from GPIO on the click handlers.
    final CheckBox cb = (CheckBox) findViewById(R.id.chkIsInput);

    cb.setOnClickListener(new View.OnClickListener() {

      @Override
      public void onClick(View v) {
       if(cb.isChecked()) {
        gpioPort.setFunction(18, PORTFUNCTION.OUTPUT);
       } else {
        gpioPort.setFunction(18, PORTFUNCTION.INPUT);
       }
      }
    });

    final ToggleButton tb = (ToggleButton) findViewById(R.id.btnPort);

    tb.setOnClickListener(new View.OnClickListener() {

      @Override
      public void onClick(View v) {
       // Only change port value if the port is an "output"
       if(!cb.isChecked()) {
        if(!tb.isChecked()) {
         gpioPort.setValue(18, 0);
        } else {
         gpioPort.setValue(18, 1);
        }
       }
      }
    });
If you look at the code you will note that the logic to change the port value doesn't appears to be right. This is because the "click" event is fired after the internal "checked" state of the toggle button is changed. So if we check if it is checked that will indicate us the action that the user wants to execute on the port.
Detecting if GPIO disconnects from WebIOPi
Other useful function is to know if GPIO is disconnected from WebIOPi, you can monitor a "disconnect" event using the GPIO.ConnectionEventListener interface. Just implement this interface in your activity and add the method "onConnectionFailed":
public class MainActivity extends Activity implements GPIO.PortUpdateListener,GPIO.ConnectionEventListener
This method is going to be called each time that GPIO loses the connection to WebIOPi:
  @Override
  public void onConnectionFailed(String message) {
 // TODO Auto-generated method stub
  }
Just remember that the pooling stops at the time of losing the connection. You will need to start a new thread to continue the update.
At this point your application must look like this:
You can download the complete source for this working example from the following address:
More functions
libGPIO provides all the functions available on WebIOPi, you can check the Javadoc reference for more information at this address:
If you want to know more about WebIOPi you can visit the following address:
I hope that you will find this code useful. See you next time!


Comentarios
Certaines personnes ont signalé des problèmes avec la dernière version de WebIOPI. Je travaille pour résoudre ce problème, peut-être d'ici la fin de la semaine, je vais avoir une solution.
I have updated the source code on GitHub, it now works with WebIOPi 0.6.0. There are new functions on WebIOPi but I have not had time to work on it.
Regards,
Mario
but how do I stop the update thread?
because even if I close the application the thread remains active
thank you
Plz tell me all the instructions from the beginning to run the above android application.
I mean before writing the above android application what are the necessary steps to be followed first.